Using the Alethea Online Portal
Using the Alethea Online Portal
Within this guide you will find information about how to use the Alethea online portal.
Taking Images and Accessing Image Gallery
- To access our web portal camera extension as well as your Alethea Photo Gallery, click "Imaging” and then "Camera" on the left hand tool-bar.

- Once on the “Camera” Page you may be prompted to allow permissions to access the camera, hit “okay” and you will be ready to start.
- On this page you will see the camera window with the option to switch between different camera lenses available (Internal Computer Camera, or Alethea’s digital otoscope), and the option to switch between video recording and single image capture.
- Physicians now have the option to plug their Alethea provided otoscope directly into their clinic computer during a patient examination and no longer require a mobile device if they do not want it, they simply have to select “HD Camera(1902:8301)” from the device drop down menu.
- Once ready to take a picture or video, simply click “Capture” and the image will be taken and placed into your gallery.

- On The Toolbar on the left hand side of the page, You will be able to Select “Gallery” where you will find your complete gallery of photos, organized by date. Any photos taken on the Alethea Mobile Device will also automatically appear in this gallery so there is no need to worry about losing photos. You can also now search by image tags and notes that you have attached onto your image.

- Physicians can also upload any other files/photos to the gallery by clicking “Upload Files” and dragging the desired file into the box.

- Physicians can delete photos from their library by clicking the Select button before selecting any images, and then clicking Delete Selected

Images
- In the image gallery you can access Alethea's AI prediction by selecting from the dropdown menu:


- Physicians can now add tags and notes to their images by selecting the Pencil button from the image window. Clicking this button will open the feature. As noted above, you can now search your image gallery by these tags and notes.

- Please Note: Image tags and notes will not be sent along with your eConsults, this information must e added into your eConsults separately.
Sending an eConsult
Select "eConsult" on the menu bar. This will open an eConsult form:

- If you work at more than one clinic, ensure you select the one you are sending the consult from.
- In the “Specialty” field, select the Specialty, Subsite and Specialist that you desire to consult.
- Fill the “Patient Information” fields. If it is the first eConsult you have sent on behalf of a particular patient, you will need to manually enter all of the details. If this is a patient you have sent an eConsult for before, their information will auto-populate for you once you begin typing.
- If you include the patient email, you can tap “Send eConsult copy to patient” to send the patient a copy of their eConsult. This will be sent the next day and will be automatically billed for as a patient communication, using the 03.01AD or 03.01S, by Alethea for Alethea Plus users:

- Depending on the Specialty and Subsite you have selected, you may be prompted to check various boxes in a “Symptoms” field that will come up. You may also be asked the age of the patient.
- The “Other Information” fields are where you add more information for the Specialist. This information includes Description, Questions for Consultant and Medical History. Questions for Consultant is a required field:

- Next, click any images or videos that you would like to be included with your eConsult. They will be attached in the “Gallery Attachments” field. (Note: you can only add a maximum of 5 photos and files to any single eConsult):

- If you wish to add any other attachments, you may do so in the “Other Attachments” field.
- Click “Submit” to send your eConsult.
- You can expect to receive a response from the specialist within 24-48 hours in your Secure Messaging Inbox of the Alethea Online Portal. You will receive an email indicating when you have received a response.
View your eConsult responses in secure messaging
To access your secure messaging centre, click, “Secure Messaging” on your left menu bar.

- You can move your eConsults to archived by checking the box on the left of the line item, and then clicking “archive” at the top of your inbox.

- When you click on a line item in secure messaging, you can see the full details of the eConsult.
- You can also send follow-up messages to specialists by entering and sending your message at the bottom of the messaging section. Physicians will send messages back to the consultant when they have further questions for the specialist, or would like to follow-up after a period of time, without sending a new consult.
- ATTENTION: Every time you send a new message within secure messaging, it will be tracked and submitted for billing.
- If you send multiple messages on the same day for the same patient, or a follow-up message for an eConsult from the same day, only the initial consult or or first message for that day will be accepted for billing.

- Each time you send an eConsult, receive a secure message, or send a secure message back to the specialist, there will be a corresponding eFax sent to your fax number on file (as long as you have this feature turned on in your user profile).
- If you would like to share an eConsult with anyone else (your MOA or other staff, for example) You can use the “forward” button at the top of your eConsult.
- You will then see a pop-up menu asking you to enter an email address, and any notes you would like to include.
- The recipient will receive a notification in their inbox, letting them know that they have received a secure message from you. They will be prompted to either create or sign-in to their Alethea.Care account to view the message.
- You can also export an eConsult by clicking on the “export” button at the top of your screen.
- Click the back button to navigate out of the consult, and back to your inbox or archive folder.

Sending Patient Forms
You can securely send patient forms using the “forms” tool in the online portal. To access the forms tool, click on the "Patient Communications" toggle on your left menu bar. Then select "Forms".

- If you practice at multiple clinics you will have to select the clinic that you see each patient at.
- Once on the forms page, you will select a form which you would like to send from the drop down menu. You can also preview the form before sending it to your patient(s)
- After a form is chosen, you will then input the patient data- their PHN and the email which they want to receive their forms and messages. You can add as many patients as required.
- If you would like to delay sending the form, there is a check box to do so, after which, the form will be sent at 7:00AM the following morning (For example: if you are filling out this information on a Monday evening, and would like to delay the form, it will be delivered at 7:00 AM Tuesday morning.
- Hit send! the patient will receive an email directing them to the Alethea.Care Portal where they can fill out the form and it will automatically be returned to you upon completion.
Sending One-Way Patient Emails
To access our One-Way Messaging service, select the "Patient Communications" toggle on the left hand tool-bar. Then from the dropdown, select “One-Way Messaging”.

- Once on the One-Way Messaging page, you will need to select which clinic the form will be sent from, if you practice at multiple clinics you will have to select the clinic that you see this specific patient at.
- You will then input the patient data- their PHN and the email which they want to receive their forms and messages.
- Next you can add information to the subject line, “Secure message from Dr. ________: [any text you wish to add]
- Then you will write your message, here you can add any information you would like the patient to have, as well as attach any lab/X-Ray results you think they would find useful.
- Lastly you can alter the personal signature at the bottom of your message to include any information you would like.
- If you would like to delay sending the message, there is a check box to do so, after which, the email will be sent at 7:00AM the following morning (For example: if you are filling out this information on a Monday evening, and would like to delay the message, it will be delivered at 7:00 AM Tuesday morning.
- Hit send! the patient will receive an email directing them to the Alethea.Care Portal where they can read the message you have sent.
It is important to note that this communication is a one-way message, and if the patient has any follow up questions they will have to phone the clinic or any contact information you have provided them directly.
Using Your Patient Messaging Folder
To access all your past Patient Messages and Form responses, select the "Patient Communications" toggle in the toolbar on the left hand side, then from the dropdown, select the “Patient Messages” tab:

- On this page you will be able to see all patient messages you have sent and form responses you have received in the past. Read messages will appear as with a grey highlight.
- To find older messages, we have made it easy to search based off of Patient email, PHN, message type and subject.
- To read the contents of a message, simply click on the desired response in your inbox and you will be taken to the form response.
- On this page you will see all information received from the form for you to add to any patient records.
- Physicians can also see any messages they have sent to patients by selecting the “Sent” button at the top of the “Patient Messages” screen. Here you will see the patient messages in chronological order.
- Archived messages can be found on the main “Patient Messages” page along the top of the window next to “Inbox”.
Accessing Your Billing Reports
To access your complete billing records, select the "Other" toggle on the left hand side toolbar. Then select the “Billing Report” menu item. Here you will be able to find a complete filling of all past billing claims processed on your behalf by Alethea.

- Along the top, you will see your current month’s billing, your previous months billing as well as your Year-to-date (YTD) billing amounts.
- Below you will see a visual graphic representing your usage and billing trends over the past few months.
- Moving down the page, you will see lists of any “New & Pending”, “Rejected” and “Closed” billing claims as well as a list of common reasons a claim may have been rejected.
- Lastly, physicians will be able to see a complete list of their Billing records which have been processed by Alethea.
- This list is sorted by month, and the month/ year can be changed by clicking on the current month listed
- You can also export this as a PDF, or an Excel file to keep for your own personal records.
Taking Images with the Digital Otoscope
The digital endoscope can be used to perform an examination of the ear canal/tympanic membrane, or the anterior nasal cavity. The digital endoscope is not to be used for examinations/imaging of the oral cavity. Please use the mobile rear facing camera for these examinations. The otoscope can only be used on the Online Portal, not the Android or iOS Apps.
To take a photo using the Alethea online portal and digital otoscope/endoscope, first open the Alethea portal, and prepare your endoscope. Our endoscopes are compatible with Welch Allyn pediatric otoscope tips. Firmly press a tip onto the end of your endoscope. Ensure the tip is tightly fixed to the device, and there is no wiggling or movement of the tip:

Next, plug the endoscope into your computer. Then select “Imaging” > “Camera” from the left menu. A pop-up may occur asking you to allow the accessory to connect, ensure you select “Allow”.

Before beginning your examination, check the orientation of your otoscope to ensure you are using it with the right side up. Next, ensure the toggle is set to the camera icon on the bottom middle of your screen. Finally, ensure the camera is set to “HD camera”.
You can now begin either your ear or anterior nasal cavity examination. It is typically not necessary to pull on the pinna to see a clear image of the eardrum. You will need to gently navigate the curve of the ear canal to see a clear image. When performing an anterior nasal exam, gently insert the front of your endoscope tip into the nasal cavity. Select the large orange circle to take a photo.

To record a video, toggle to the video icon at the bottom of the screen. Select the large orange circle to begin recording. Once the video begins to record, the circle will change to red, select the circle once again to stop recording. Any image taken or video recorded will automatically populate into your gallery.

Once you have completed imaging, ensure you properly clean and sanitize your endoscope. Remove and dispose of the tip. If there is any debris on the endoscope, rinse the body of the device under running water before drying, and sanitize with an alcohol wipe.
Using Alethea Care
The Alethea Care Patient Portal allows you to securely share eConsult copies, forms, and messages with patients or MOAs. This guide explains how to forward eConsults and how your recipients can easily access the information through their own Alethea Care account.
Forwarding eConsults
You can share eConsults with patients in two simple ways:
Option 1: From the eConsult Form
- When completing an eConsult, enter your patient’s email address.
- Select “Send eConsult copy to patient.”
- The patient will automatically receive a secure message with access to their eConsult copy.

Option 2: From Secure Messaging
- Navigate to your Secure Messaging folder within the Alethea Portal.
- Forward the eConsult by entering the patient’s or MOA’s email address.
- They will receive a secure link to view the information.

Signing Up for Alethea Care
When you send a message, form, or eConsult copy, your patient or MOA will be prompted to create their own Alethea Care account.
- Account Creation:
- Recipients click “Create Your Account.”
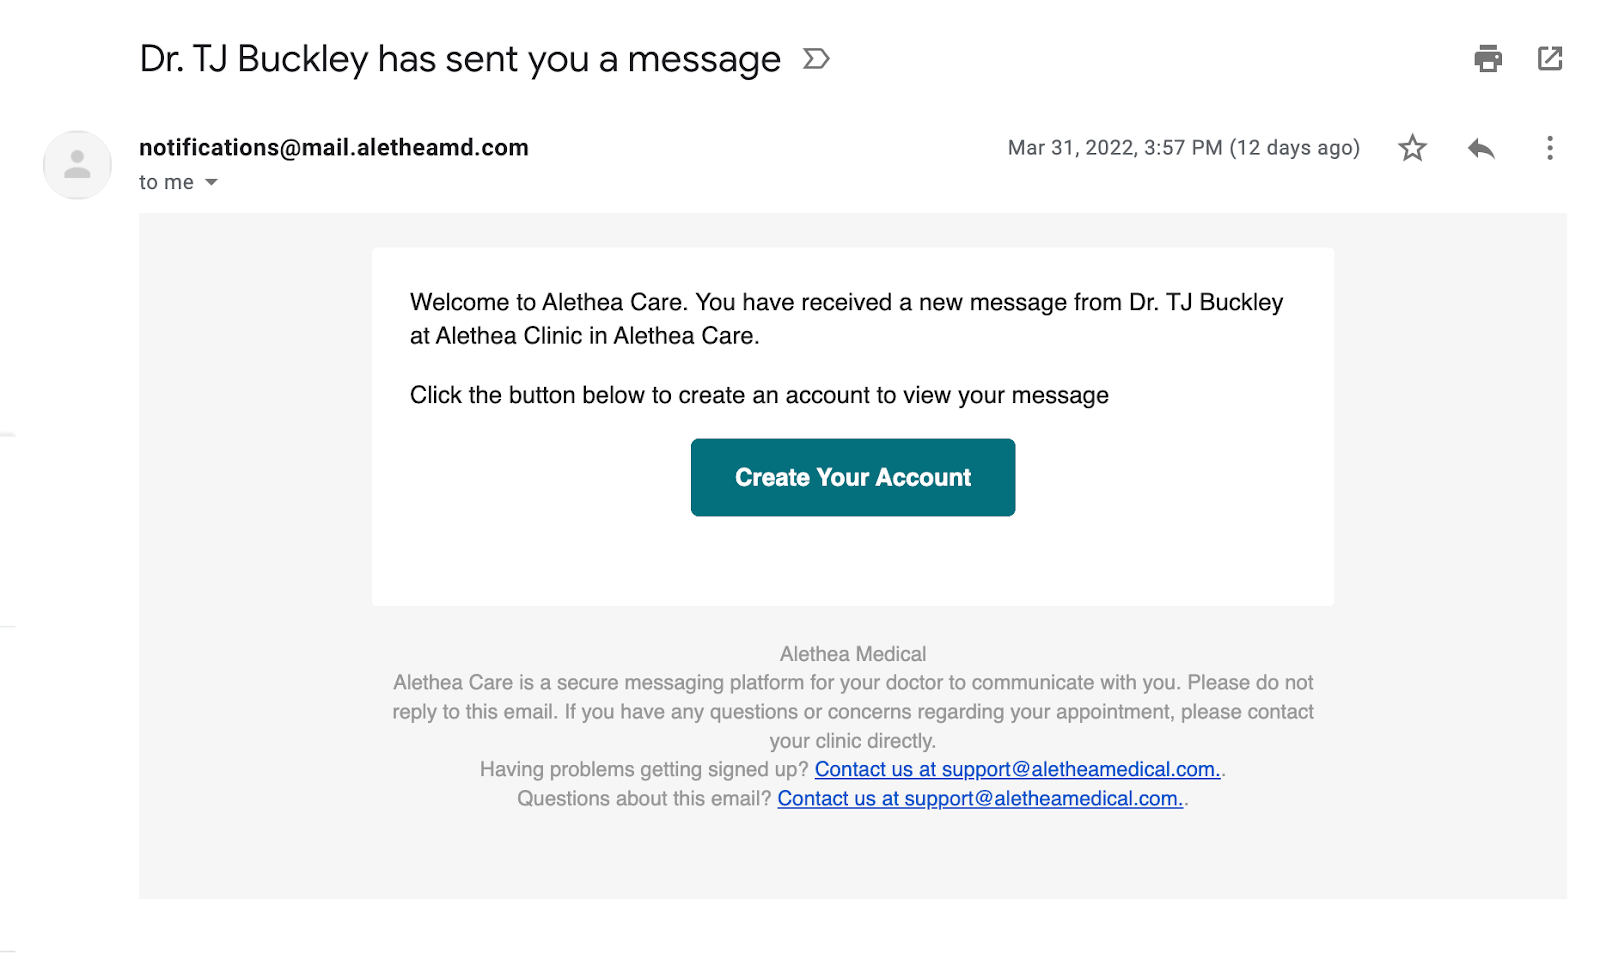
They set a password and enter basic personal details to ensure security and accurate message delivery.


(If your MOA is signing up, they should use the PHN format: 00000-0000.)
- Accessing Messages:
- Once registered, users can view all messages, forms, and eConsult copies sent to them.
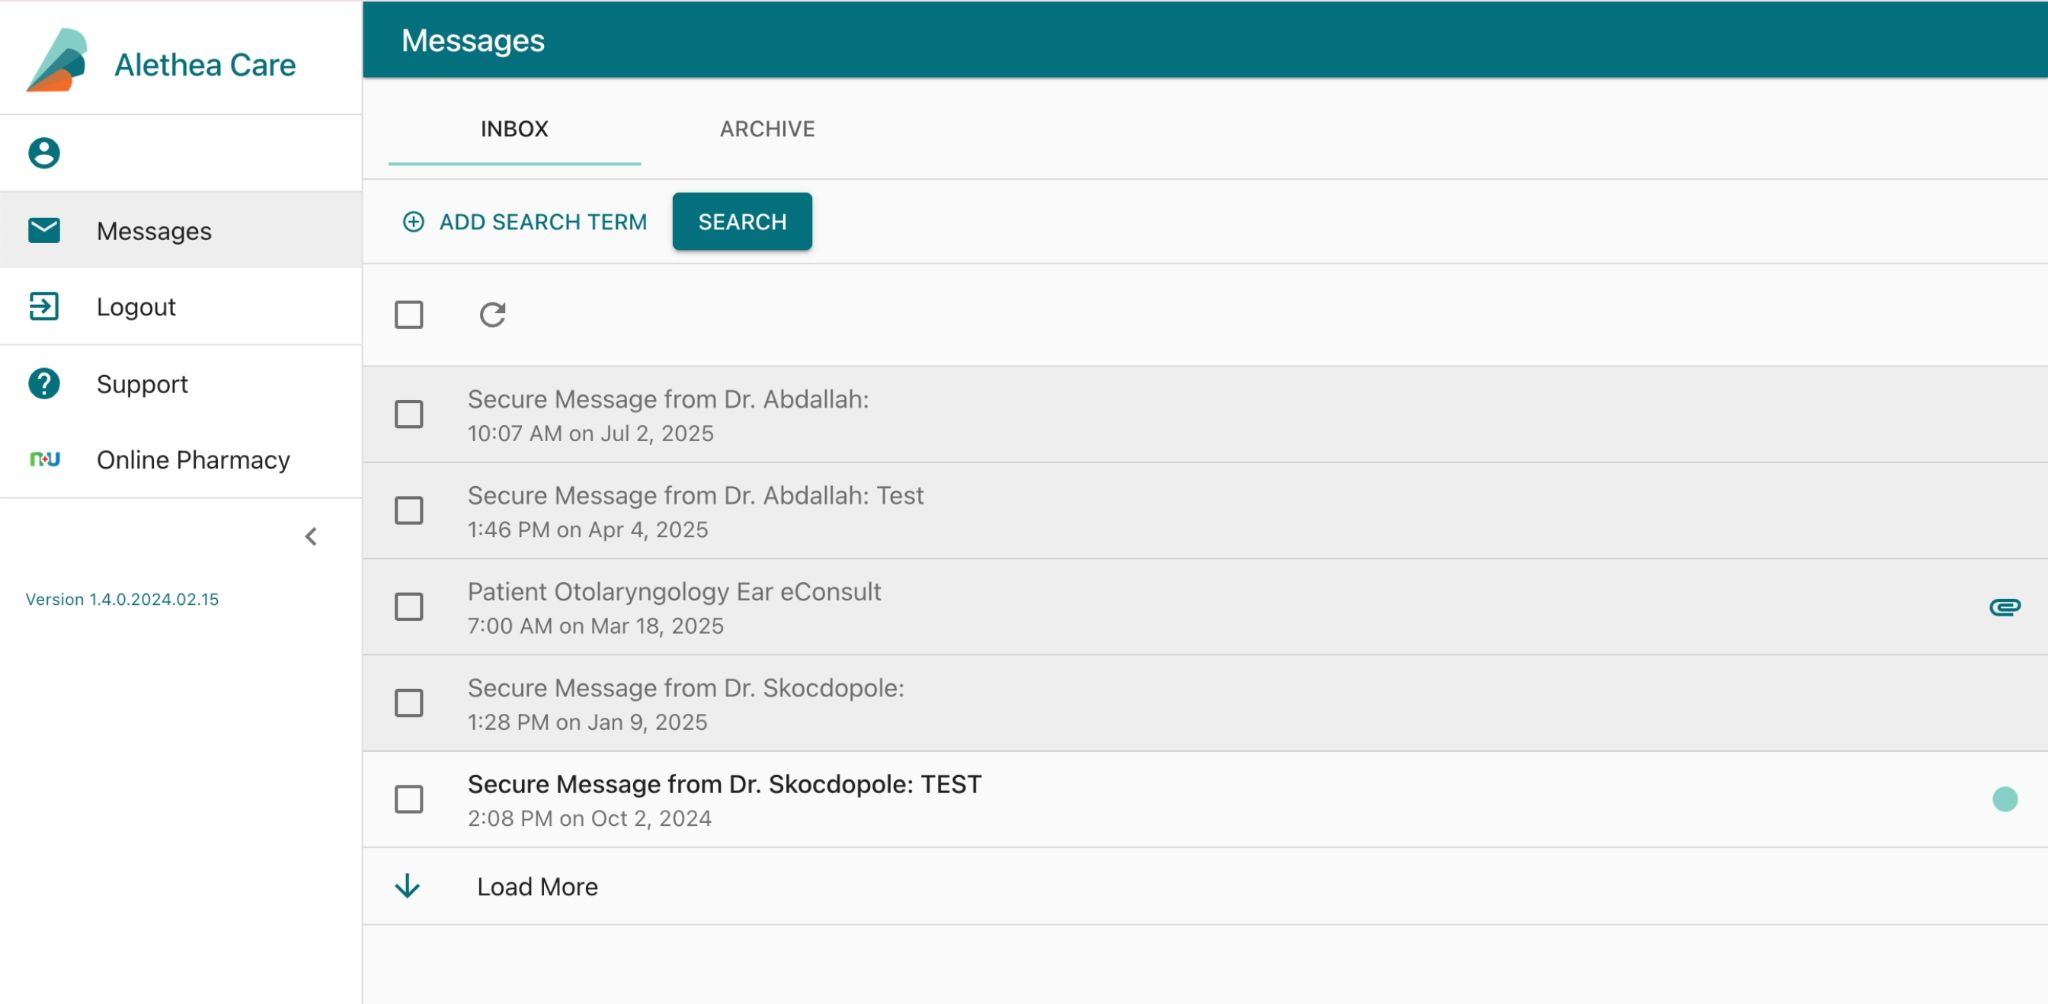
- These documents remain easily accessible for future reference.
- Receiving Notifications:
- Patients or MOAs will receive an email alert whenever a new message is available.
- They simply follow the secure link and log in to their account to view it.


